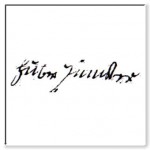
Hubert Yuncker 1828
It’s fun to use GED-GEN to add an individual’s portrait to their family group sheet. That’s fine if you have a photograph. How about adding images for ancestors who lived before photography even existed? For those folks, I like to add an image of their signature or their “mark.” Their signature is usually the only shred of personality they’ve left for us to see. For example, see my family group sheet for Hubert and Barbe Yuncker.
Here are the steps to add an image of an ancestor’s signature in place of a portrait. If your ancestor could not sign his or her name, they may have used a mark or symbol instead.
Step 1: Obtain a Document: The first step is to obtain a document or record that has your ancestor’s signature or mark. This could be a child’s birth record signed by a parent. It could be a marriage record signed by the bride or groom, their parents or other witnesses. It could be a land deed or a last will and testament.
Step 2: Create an Electronic Copy: If you found an image online, download and save that image. If you found it on microfilm or on paper, take a digital picture if possible. Otherwise make a Xerox copy or print the image, then scan that to create an electronic copy.
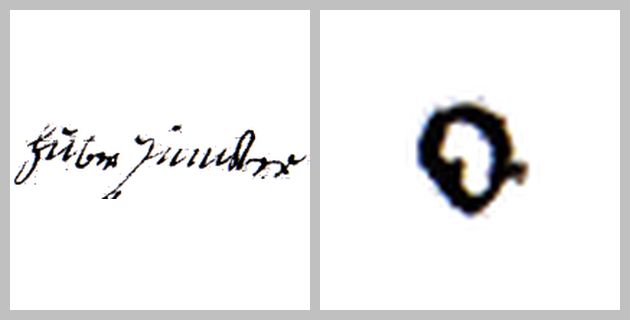
Step 3: Edit the Image: Open the image of the document in an image editing program. I suggest you edit a copy of the image so you do not accidentally change the original image. I’ll use an 1828 marriage record that shows the signature of the groom, Hubert Juncker, and the mark of the bride, Marie Barbe Gossé. Her mark is the symbol O surrounded by a circle with the writing “Marque de Gossé, Marie Barbe.”
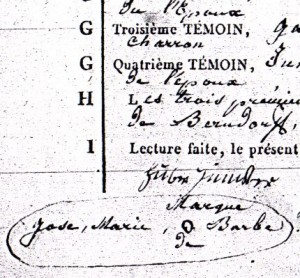
The following steps apply generally to most image editing programs, without being specific to any particular program. In the illustrations below, the signature and mark appear side by side. I work with the signature on the left side. I would then repeat the steps for the mark, on the right side.
Step 3a: On the image, select the signature/mark. Drag your mouse around the signature/mark using the editor’s selection tool. Try to get just the signature/mark, but also the whole signature/mark including all the loops and flourishes.
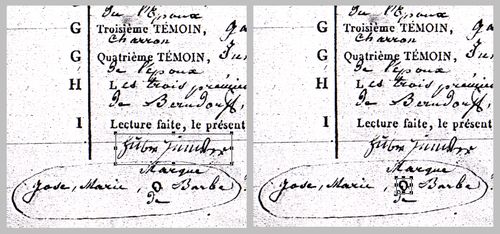
Step 3a
Step 3b: Crop the image to that selection. As an alternative, you could copy and paste the selection to create a new image.

Step 3b
Step 3c: Undoubtedly the new image will contain residual portions of the writing that surrounded the signature/mark. Now is the time to remove all the extraneous marks and noise so you are left with just the signature/mark. Try the eraser tool, the “magic wand” selection tool, or select and cut such noise away.

Step 3c
Step 3d: Convert the image to a 256 gray scale image, unless it is already 256 shades of gray or less. This step may result in a smaller file size, especially since the signature/mark is usually just black and white. You want about 256 shades of gray though to maintain the detail of the pen strokes.
Step 3e: Change the resolution of the image to 300 dpi.
Step 3f: Resize the image width to be a set number of pixels larger than its current width. Be sure to keep the aspect ratio however so the height is changed proportionately. I like to use 400 pixels for signatures and 250 pixels for marks. For instance if the signature is now 375 pixels wide, resize it to be 400 pixels wide. A mark will usually be just a small character. If it were 27 pixels wide, I would change it to 250 pixels.
The idea is to make the writing easy to read by enlarging it. It also helps to be consistent so all your signatures will have the same size. Thus I tend to use 400 and 250 pixels, respectively.
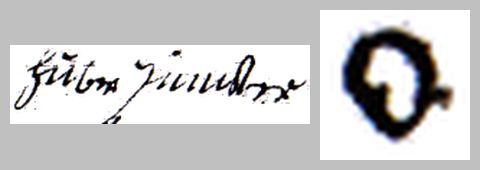
Step 3f
Step 3g: For signatures, change the canvas size of the image, in height only, so that it is the same number of pixels high as it is wide. This makes the image a square. For instance if the signature is now 400 pixels wide, expand the canvas in height only to 400 pixels high. Keep the canvas width the same.
For marks, change the canvas size in both height and width to be 300 pixels, or a set number of pixels larger than the image width. In this example, the mark is already 250 x 250 pixels, so I changed the canvas size to be 300 x 300 pixels.
In both cases, use the option to keep the image centered vertically and horizontally when you change the canvas size.
Step 3g
Making the image square is an important step. Most portraits of people are higher than they are wide. If you kept the signature wider than it is high, your genealogy program may display it exceptionally large, or exceptionally small. A square image will be treated like other portraits.
Step 3h: Now resize the image to be 300 pixels wide. Since it is already 300 dpi in resolution, this should result in an image that will print as a 1 inch by 1 inch square image. On a computer screen, this usually gives adequate resolution and detail. You may want to experiment however. If you use the image for other purposes besides your GED-GEN family group sheets, you may want a different size.
Step 3i: Finally, save your image as a GIF file. This usually results in a smaller file size than a JPG image. You could save it as a JPG or PNG if desired.
Now you can add “portraits” of your ancestors using the scrapbook feature of your favorite genealogy program. Instead of their likeness, you will display their signature or mark. You can also use GED-GEN to display these “portraits” on your family group sheet web pages.
