Steps for Using Custom Features
The steps to use either of the two customization methods are described below.
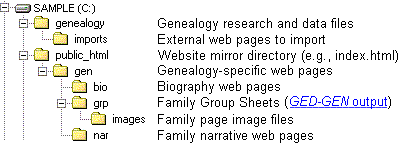
The first step in either method is to establish a folder structure for your website. As an example, here is one possible hierarchy:

The genealogy folder contains your genealogy research files while public_html contains your website web pages. It is suggested that you have a staging area on your own computer that mirrors the directory structure at your Internet Service Provider (ISP). This makes it easy to transfer web page files from one place to your website at the ISP. Many ISPs name this directory (or folder) public_html.
The imports folder contains the files that GED-GEN will import directly into your family pages as part of the Imported Text feature. These files themselves are not part of your website and are therefore not stored under the public_html folder. The images folder contains image files for both individuals (Individual Images) and family groups (Group Images).
Notice that files associated with a custom feature are in folders relative to the GED-GEN destination folder, which is C:\public_html\gen\grp. For example GED-GEN generates a link to one of your biography web pages by appending a unique biography file name (e.g., bio0022.html) to the relative path for biography files (e.g., ..\bio). The resulting link would be ..\bio\bio0022.html.
All files for any particular custom feature reside in the same folder. Thus all biography files must reside in the bio folder. This avoids storing the folder along with every unique biography file name. Since the folder is specified separately, you can change folder names in the future, without having to modify the biography file specification for each individual.