Steps for Method 1: "Facts" in GEDCOM File
To use this method, first add information to your family data file, then export that data to a GEDCOM file, and then enable the custom features in GED-GEN. The steps are as follows:
- First devise a folder layout for your website, such as the example given.

- Next decide upon a naming convention for the "facts" (or "events")
you will define for the custom features. By default,
GED-GEN uses the following fact tags:
Custom Feature "Fact" Tag Biography Link *Biography Relationship Text *Relation Individual Image *Image Narrative Link *Narrative Imported Text *Import Group Image *Group You can use any tag naming convention you prefer as long as you use the same fact name for all facts of the same type. If you use *Biography for a biography fact, be sure to use *Biography for every biography fact.
- Run your favorite genealogy program, with which you maintain your
family tree data. This is a program like Family Tree Maker or
Personal Ancestral File.
- Navigate to an individual or family for whom you want to define
custom features.
- Simply create a new "fact" (or "event") for this individual or
family. How you do this depends upon your genealogy program, but it is
similar to creating an event for say, a baptism. For example if you
want to define a biography link for an individual, create a fact using
the biography tag (e.g., *Biography).
Facts for families should generally be created at the family level rather than for a specific individual in the family. Family facts include narrative links, imported text and group images. For instance to define a group image, create a fact under the marriage information using the group image tag (e.g., *Group). This is just like adding an alternate marriage date.
- The fact's date field is ignored and can be left blank.
- Specify the fact's place field according to the custom
feature you are defining:
Custom Feature Place Field Contents Biography Link or
Narrative LinkSpecify the name of your web page file containing a biography for this individual or the narrative for this family (e.g., grandpa.html). Do not include a folder because it is specified within GED-GEN. Relationship Text Specify the relationship phrase that indicates this person in your direct line of descent (e.g., Grandfather). Imported Text Specify the name of an external text file or web page that GED-GEN will insert into the family page (e.g., history22.html). Individual Image or
Group ImageSpecify the name of an image file containing a picture of this individual or family group (e.g., grandpa.jpg). Do not include a folder because it is specified within GED-GEN.
You may optionally specify a caption for your image. It will appear centered directly under the image on the family page. For example you could specify the date of the picture. Use HTML syntax.
To specify a caption, type a semicolon (;) character immediately after the name of your image file. Any text you type after the semicolon will be interpreted as the caption, for example, grandpa.jpg;About 1922.
- Define other custom feature facts for this individual and/or family
as desired. If you just created a biography fact, you could create a
relationship fact, and so on.
- Navigate to other individuals and families in your family file and
continue to add facts for each as desired.
- When you are done, export your family data to a GEDCOM file as you
would normally.
- Run GED-GEN and click the Options button.
- Be sure to specify your input GEDCOM file and a destination folder
on the Files tab.
- Click the Custom tab.
-
Method tab and verify the following fields specify the "fact" tags you used in your favorite genealogy program (from Step 2 above):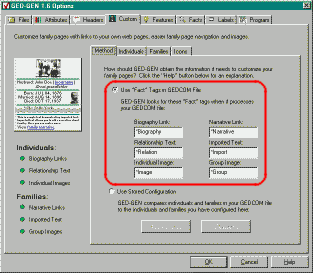
Step 14- Biography Link
- Relationship Text
- Individual Image
- Narrative Link
- Imported Text
- Group Image
-
Enable the custom features you wish by placing a check in any or all of the these fields: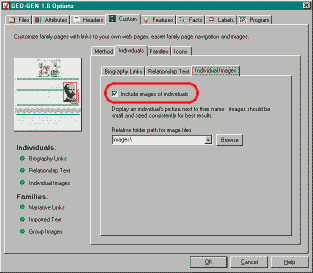
Step 15
Tab Option Biography Links Include links to biography web pages Relationship Text Include relationship text Individual Images Include images of individuals Narrative Links Include links to narrative web pages Imported Text Include imported text Group Images Include group images
-
Also on the above tabs, specify the path for the folders that contain your web pages and image files. Click to more easily specify these paths.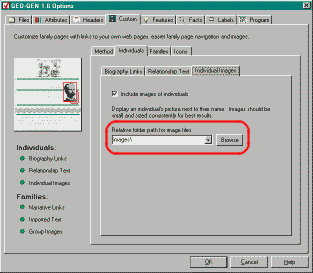
Step 16
Following the sample folder structure, these options would be set as:
Tab Option Contents Biography Links Relative folder path for biography files ..\bio Individual Images Relative folder path for image files images Narrative Links Relative folder path for narrative files ..\nar Imported Text Full folder path for external files C:\genealogy\imports Group Images Relative folder path for image files images