Configure Dialog

This dialog appears when you click or under Method on the Custom tab. Use it when you choose the Stored Configuration method for custom features.
Before using the "Stored Configuration" method to define custom features for the families in your GEDCOM file, refer to the discussion about Family Page References.
A list of all individuals (or families) in your GEDCOM file is displayed. Scroll to a particular individual (or family) and click on their name so it appears highlighted. Then enter custom feature attributes for that entry. Continue by clicking on another entry and defining attributes for it.
Entries marked with a green dot are those for which you have specified one or more attributes. When configuring families, entries are listed with the names of the husband and wife.
| Option | Meaning | ||||||||||||||||||
|---|---|---|---|---|---|---|---|---|---|---|---|---|---|---|---|---|---|---|---|
| Search | Rather than scroll through the list, you can quickly find a name by typing the first few letters in this field. Names are sorted by surname, then a comma and space, then the given names. | ||||||||||||||||||
| Up/Down | If you have already defined attributes for one or more entries, you can use
the "Up" or "Down" buttons next to the search field. These buttons highlight
the next entry for which attributes are already defined. This is a quick way to
move between such entries. Hint: You can also press the Alt key along with the DOWN arrow or UP arrow key. |
||||||||||||||||||
| Attributes for Highlighted Entry |
Specify any custom feature attributes for the entry currently highlighted in the list. When specifying a file name, the source location is the folder you specified on the Custom tab. Click to easily specify an existing file from that folder.
The following attributes differ depending on whether you are configuring individuals or families:
For Individuals...
For Families...
Click to clear all attributes you have specified for the currently highlighted entry. |
||||||||||||||||||
| Aliases | Place a check here to display aliases in the names of individuals, if any.
The alias will appear in quotation marks after an individual's given name. For
example if John Doe went by the name Jack, the entry appears as: Doe, John
"Jack". Aliases may help you differentiate individuals with the same name. This feature is not available with GEDCOM files exported from certain genealogy programs. |
||||||||||||||||||
| Sort by | When configuring individuals, you can sort the list alphabetically by name,
or by reference ID. When configuring families, you can sort by name of husband,
by name of wife, or by reference ID. When sorting by reference ID, GED-GEN compares numeric values. For instance family F2 appears before family F100 since 2 is less than 100. |
||||||||||||||||||
| Click this button to clear all attributes for all individuals (or
families). You will erase all attributes you have entered for all entries. If
you are configuring individuals, this action will not reset the
attributes defined for families. Likewise if you are configuring families,
individuals are not affected. If you simply want to avoid using custom features, you should disable the respective feature on the Custom tab. That way you can retain your attribute settings in case you want to enable one or more features in the future. |
|||||||||||||||||||
| This button is enabled when there are attributes defined for individuals (or families) who are not in the current GEDCOM file. Use it to clear the attributes for only those individuals (or families). (See "Extra" Entries below.) |
![]() = Feature is available only in the registered version.
= Feature is available only in the registered version.
When you specify a file name above, GED-GEN assumes that all files for a given custom feature are in the same folder or in a sub-folder under that folder. You specify that path back on the Custom tab, under the respective custom feature. For instance all biography web pages must reside in the same folder, such as bio. Specify the name of a file on the Configure dialog and the folder bio under Relative folder path for biography files under Biography Links on the Custom tab.
You can choose a file that is in a sub-folder under your defined folder. Suppose your biography files are in the bio folder and you have a folder under bio for your Jones family line. The Jones folder itself has a folder named John where the file biography.html resides. When you browse for biography.html and click OK, your file will appear as Jones\John\biography.html.
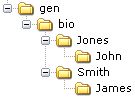
In this case, Jones\John\biography.html is still under the bio folder.
When you click above to select a file name, you may select a file that resides in a completely different folder. If that path is different from the path you specified on the Custom tab, GED-GEN can automatically change the path on the Custom tab for you. You will see a message that asks,
If you click Yes, the path specification for that custom feature on the Custom tab is changed to the new folder. If you click No, the path is not changed and you will have to change it manually.
When you click Yes, you should ensure any previous file names you specified for that custom feature are in the new folder as well. For instance if you have been choosing biography files for individuals from one folder, and then for the next individual you select a file in another folder, two different folders are involved. All your biography files must be in the same folder or in sub-folders under that folder.
"Extra" Entries
When using the Stored Configuration method to define attributes for the individuals and families in your GEDCOM file, you should keep a separate GED-GEN option set for each GEDCOM file. Create a new options set, or open an existing one using the Files tab.
If you do not use separate option sets, the attributes you define for each GEDCOM file will accumulate in just one options set. As long as the reference numbers for the individuals and families in your GEDCOM files do not overlap, this may be acceptable. However if a given reference number is assigned to different individuals (or families) in each GEDCOM, then the custom features displayed may be inaccurate.
Example:
Suppose you define attributes for 5 individuals in a GEDCOM file named ABLE.GED. You later decide to use a different file on the Files tab called BAKER.GED. You then define attributes for 10 individuals in BAKER.GED. The Configure dialog will indicate:
including 5 entries not in this GEDCOM file
The 5 entries from ABLE.GED are not in the current GEDCOM file and are considered extra entries. When you generate your web pages, only individuals from BAKER.GED are processed.
Depending on your circumstances, you may want to purge the attributes defined for individuals from ABLE.GED and keep only those defined for BAKER.GED, which is the current input GEDCOM file. If so, click above.
Alternately if ABLE.GED and BAKER.GED were exported from the same family data file, the individual and family reference numbers will probably not overlap. You can use the same options set to generate web pages from either ABLE.GED or BAKER.GED.
If ABLE.GED and BAKER.GED were exported from different family data files, you should verify all the attributes you have defined. Not only might there be "extra" individuals or families, but the reference numbers in common between ABLE.GED and BAKER.GED will probably cause inaccurate results.
If you need more information, click the Summary button on the Files tab. It displays the contents of your options set file, including all the attributes you have defined.